This year has brought to the Mid-Atlantic Region what some would say is a “treat” and others a say its a “curse”. I say its great if you know how to enjoy it. Depending on where you live, we have been blessed with 18-30″ of snow. Unfortunately with a broken leg I am limited to what I can do in this much snow. Whether in the suburbs or the deep woods, it doesn’t matter what time of year it is, you can practice, use, and test all sorts of wilderness survival and primitive skills. Now its time for some winter survival skills.
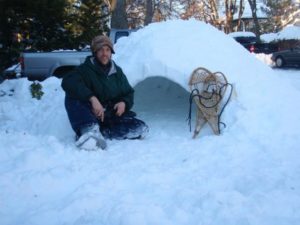
I wasn’t about to miss out on the fun of a DC metro area blizzard, broken leg or not. As the snow had reached a level of knee high it was time for the first winter survival test, “travel”. My goal was to test out the snow shoes that my buddy made. Andrew Pinger hand crafted these using ash splints and rawhide. Having an air cast on my leg and no longer needing crutches gave me the courage to attempt a trudge across the tundra mile after mile. Around 2am I decided to strap myself in to these handmade beauties and set out on my 1st winter adventure.
The streets were silent and the snow was gentle as I explored the vast and unpredictable concrete jungle. As I made my way down the road I noticed that I was sinking in to the light fluffy snow about 8 – 10 inches. Travel was a bit difficult but I knew it was better then sinking in 18 inches, which was proven later as I fell over and one of the shoes came loose making me plant a foot. Another benefit of snow shoes is they keep snow from filling up your boots when you walk in the deep snow. My short trek of 100 yards made it obvious that there must be different ways to make snowshoes for different types of snow types and conditions whether its fluffy, wet, or settled snow on which you are traveling.
As the storm continued I began shoveling my walks to avoid having to move copious amounts of snow all at once when the storm was over. As I piled the snow in the corner of the front yard I knew I would be able to build a snow shelter using the piled up snow. By the end of the storm I had collected a pile of snow that was about 12′ long 8-10′ wide and 5′ tall. The next morning we would start to make the shelter complete.

How to safely build a snow shelter
- After piling up the snow let it settle for about and hour or so. Settling time will depend on what type of snow you have and the location where you are building it. You can pack the snow down to help the process along but its not necessary. Once your pile is made, shape or sculpt the structure to have a nice even surface. This will aid in keeping your wall thickness consistent throughout the construction.
- Once you have let the pile settle it is recommended that you push 10″-12″ sticks into the pile. Make sure sticks are perpendicular to the surface of the pile. I placed them every 14″ in all directions .
- Starting in the door way area begin to dig. To avoid a cave in, work from the ceiling down. Continue digging until you hit the ends of the sticks. When when you are shaping the inside of the shelter make the sleeping area higher then the entrance. The higher the better.
- once you get about half way through, go to the opposite side and start digging another small entrance. This helps avoid moving snow twice as far.
- Once the inside is dug out, seal off the second opening leaving an arm sized air hole.
When the shelter is complete you will need is a door. If you can make the sleeping area higher then the ceiling of the entrance way, you will create an air lock, and you won’t need a door. You will have to get creative on keeping the wind out and the warmth in. I used a blanket as my door. The temperature was 22 degrees outside and 40 degrees inside with one person inside. With more people inside it will be much warmer.
I will be adding an elk hide with the fur still on as the floor mat. With a couple of soapstone oil lamps and my family kicking it inside, we are sure to be warm and toasty for our blizzard of 2010 abo family scrabble game. I will let you know how it goes.
With another 15 inches of snow coming I will be able make it a more comfortable size inside for the family while increasing the height of the sleeping platform.

